How a home blood pressure test devices accuracy use correctly is crucial for reliable readings. Understanding the nuances of your device, proper technique, and recognizing potential pitfalls is key to accurate self-monitoring. This guide dives deep into the mechanics of home blood pressure monitors, explores factors affecting accuracy, and provides step-by-step instructions for optimal results. From selecting the right device to interpreting your readings, you’ll gain the knowledge to effectively manage your blood pressure at home.
Home blood pressure monitors are invaluable tools for self-care, allowing you to track your readings and communicate effectively with your doctor. However, ensuring accuracy is paramount. This guide unpacks the various types of devices, their unique characteristics, and the critical steps to follow to guarantee reliable results. Learn how to avoid common errors, maintain your device, and interpret your readings correctly, ultimately empowering you to take charge of your health.
Understanding Home Blood Pressure Devices
Home blood pressure monitoring is a valuable tool for managing cardiovascular health. Accurate readings allow for better self-management of blood pressure and enable individuals to work effectively with their healthcare providers. This section delves into the inner workings of home blood pressure monitors, covering their types, components, measurement methods, and common models.Home blood pressure monitors offer a convenient way to track blood pressure levels at home.
This empowers individuals to actively participate in their health management and to detect potential problems early. Understanding the different types of monitors, their features, and limitations is crucial for selecting the most appropriate device for personal needs.
Getting accurate readings from your home blood pressure monitor is key. Proper technique is crucial, just like understanding the simple science behind why masks work, the simple science behind why masks work influences how we approach protection. Similar principles apply to blood pressure; a stable environment and consistent technique are vital for reliable results. Remember to follow the instructions carefully and consider factors like time of day and activity levels.
Types of Home Blood Pressure Monitors
Home blood pressure monitors utilize various technologies for measurement. Understanding these differences helps in choosing the right device for accuracy and personal preferences.
- Oscillometric Monitors: These are the most common type, employing a cuff that inflates and deflates automatically. The device measures pressure fluctuations in the artery to calculate blood pressure. This method is generally considered reliable and relatively easy to use.
- Aneroid Monitors: These older monitors use a mechanical gauge to measure blood pressure. They require manual inflation and deflation of the cuff. While less common now, they are sometimes favored for their simplicity and for situations where battery power isn’t available.
- Digital Monitors: This is a broad category, encompassing a variety of electronic monitors, including oscillometric devices. They are generally easy to read and use, offering a clear digital display of blood pressure readings.
Components of a Home Blood Pressure Monitor
Home blood pressure monitors, regardless of type, have key components that work together to provide readings.
- Cuff: The cuff is a band that is wrapped around the upper arm. Its size and material can impact the accuracy of readings. A properly fitted cuff is essential for reliable measurements.
- Pressure Sensor: This component detects the pressure changes within the cuff during inflation and deflation. The sensor’s sensitivity directly impacts the accuracy of the blood pressure reading.
- Microprocessor (in oscillometric monitors): This electronic component processes the pressure data collected by the sensor, calculating the systolic and diastolic readings. Sophisticated microprocessors often include additional features like memory for storing readings and automatic inflation/deflation.
- Display: The display clearly shows the measured blood pressure readings, along with other parameters such as the date and time.
Measurement Methods
The methods used by different blood pressure monitors vary.
- Oscillometric Method: This method is widely used. It inflates and deflates the cuff automatically, measuring the oscillations in the artery to determine the systolic and diastolic blood pressures.
- Aneroid Method: The aneroid monitor relies on a mechanical gauge to directly measure pressure fluctuations. The user manually inflates and deflates the cuff.
Common Blood Pressure Monitor Models and Features
Numerous models are available, each with unique features. Some popular brands include:
- Omron: Omron models are known for their accuracy and ease of use, often featuring automatic inflation and deflation. They typically have large, clear displays.
- A&D: A&D is another well-regarded brand, often offering a range of models with different features and price points. They often incorporate features for users with specific needs.
- Welch Allyn: Known for their accuracy and advanced technology, Welch Allyn models frequently come with features like memory functions and automated readings.
Comparison of Home Blood Pressure Monitor Types
The following table summarizes the key differences between the various types of home blood pressure monitors.
| Feature | Oscillometric | Aneroid |
|---|---|---|
| Accuracy | Generally high | Can vary, potentially lower |
| Ease of Use | High, automatic inflation/deflation | Lower, manual inflation/deflation |
| Cost | Medium to High | Lower |
| Portability | Generally portable | Less portable |
Factors Affecting Accuracy
Knowing your blood pressure is crucial for your health, but the accuracy of your home readings depends on several factors. Understanding these influences allows you to take more reliable measurements and get a clearer picture of your cardiovascular health. Inaccurate readings can lead to unnecessary anxiety or missed opportunities for early intervention.
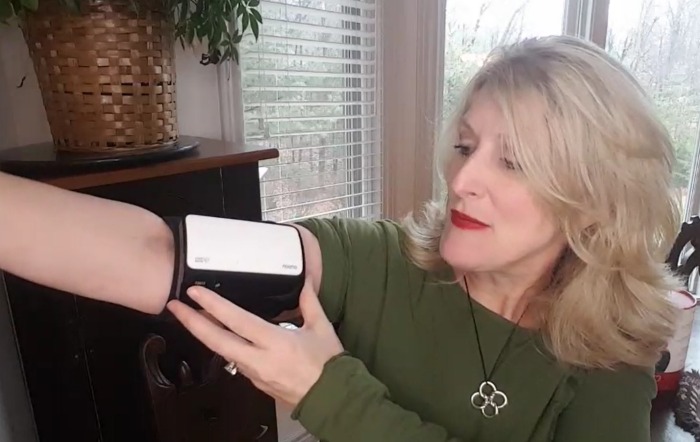
Proper Cuff Placement
Accurate blood pressure readings rely heavily on correct cuff placement. Incorrect placement can significantly skew the results, leading to either falsely high or low readings. The cuff should be positioned snugly but not too tight around the upper arm, centered over the brachial artery. A cuff that is too loose will result in an underestimation of blood pressure, while a cuff that is too tight will produce a falsely elevated reading.
- Cuff Size: Ensure the cuff is the correct size for your arm. A cuff that is too small will compress the artery excessively, while a cuff that is too large will not properly constrict the artery, both leading to inaccurate readings.
- Cuff Centering: The inflatable part of the cuff should be positioned directly over the brachial artery, typically located on the inside of the upper arm, at the level of the heart.
- Cuff Tightness: The cuff should be snug but not constricting. It should compress the artery but not cut off circulation. A good rule of thumb is that you should be able to comfortably place one finger underneath the cuff.
Patient Positioning
The patient’s position during the measurement is also critical. A relaxed and stable posture ensures more accurate readings.
- Seated Position: The patient should be seated comfortably with their feet flat on the floor and their back supported. Avoid positions where the patient might be leaning forward or backward, or have their arms elevated above heart level.
- Relaxation: Encourage the patient to relax and avoid any unnecessary movements during the measurement. Stress and anxiety can significantly elevate blood pressure, leading to inaccurate readings. Remind the patient to avoid talking or moving around until the measurement is complete.
- Arm Support: The arm being measured should be supported at heart level. This prevents the arm from falling or raising during the measurement, both of which can cause erroneous readings.
Time of Day and Physiological Factors
Blood pressure fluctuates throughout the day, influenced by various physiological factors. These fluctuations can impact the accuracy of home readings if not accounted for.
- Time of Day: Blood pressure typically rises during the day, often peaking in the morning and evening. Readings taken at different times of the day can provide a more complete picture of your blood pressure patterns.
- Stress and Emotions: Stress, anxiety, and excitement can cause a temporary elevation in blood pressure. If a reading is taken immediately after a stressful event, it may be inaccurate. Encourage patients to relax and avoid stressful situations immediately before taking a measurement.
- Medication: Certain medications can affect blood pressure readings. Be aware of the timing of medication intake and adjust your reading schedule accordingly.
Common Mistakes and Corrective Actions
Several common mistakes can lead to inaccurate readings. Recognizing these errors is key to improving the reliability of your measurements.
| Potential Error | Corrective Action |
|---|---|
| Cuff too tight | Adjust the cuff to a snug fit, ensuring one finger can be placed underneath. |
| Cuff too loose | Adjust the cuff to a snug fit, ensuring it is properly positioned over the brachial artery. |
| Incorrect cuff size | Use a cuff appropriate for the patient’s arm size. |
| Patient movement or anxiety | Instruct the patient to relax and avoid movement during the measurement. |
| Inconsistent measurement times | Establish a consistent time for measurements to track daily patterns. |
Correct Usage Procedures
Mastering the correct usage of your home blood pressure monitor is crucial for accurate readings. Inaccurate readings can lead to incorrect diagnoses and potentially flawed treatment plans. Understanding the specific steps involved, from positioning to cuff inflation, ensures reliable data and helps you maintain your health effectively.Proper technique is key to achieving accurate results. Following the manufacturer’s instructions and using the device correctly minimizes errors and maximizes the reliability of the data obtained.
Essential Steps for Accurate Readings
Understanding the proper procedures for using a home blood pressure monitor is paramount for obtaining accurate readings. This involves more than just placing the cuff on your arm; it encompasses a series of steps that, when followed diligently, lead to more trustworthy results.
Knowing how to properly use a home blood pressure monitor is key to accurate readings. Following the device’s instructions is crucial, but did you know that even minor lifestyle changes, like the time shift during daylight saving time, can affect your body’s natural rhythms, leading to feelings of being off-kilter? For more on why you feel out of sorts after daylight saving time, check out this helpful article: why you feel out of sorts after daylight saving time.
Remember, consistent use of the correct technique is vital for reliable home blood pressure readings.
- Correct Arm Placement: Position your arm at heart level, supported and relaxed. Ensure the cuff is centered over the brachial artery, usually located on the inner side of the upper arm.
- Relaxation: Avoid talking or moving during the measurement. Rest for a few minutes before taking your reading to ensure your blood pressure is at a baseline level. Stress and movement can significantly alter readings.
- Cuff Inflation and Deflation: The technique for inflating and deflating the cuff is crucial for accurate readings. This will be discussed in more detail in the next section.
- Multiple Readings: Taking multiple readings and averaging them is a standard practice to account for fluctuations and obtain a more representative value. More about this later.
- Calibration: Regularly calibrating your device with a professional blood pressure monitor can help ensure the accuracy of your home readings.
Proper Cuff Inflation and Deflation
Correct cuff inflation and deflation are essential to obtaining accurate blood pressure readings. Incorrect procedures can lead to inaccurate readings.
- Cuff Placement: Ensure the cuff is properly positioned on your arm, centered over the brachial artery. It should be snug but not excessively tight. Too loose a cuff may cause the pressure to not register properly; too tight can cause inaccurate readings.
- Inflation: Inflate the cuff to a pressure approximately 20-30 mmHg above the point where the pulse disappears. This step helps ensure the device captures the systolic pressure accurately. Too slow or too rapid inflation can introduce errors.
- Deflation: Deflate the cuff slowly and steadily. The pressure should decrease at a moderate pace. Too rapid deflation can lead to inaccurate readings, especially in the diastolic pressure measurements. The sound should be audible and consistent, indicating a proper blood pressure measurement.
Ensuring Device Calibration
Regular calibration is essential for maintaining the accuracy of your home blood pressure monitor. Over time, the device’s internal components can wear out, causing inaccuracies.
Regularly check your device against a professional blood pressure monitor to ensure accuracy. Manufacturers often provide instructions for self-calibration or suggest contacting a medical professional.
Following Manufacturer’s Instructions
Adherence to the manufacturer’s instructions is crucial for accurate blood pressure readings. Each device has specific guidelines for usage, and deviating from these can significantly affect the accuracy of the results.
“Always refer to the manufacturer’s instructions for specific procedures, as variations exist between models.”
Taking Multiple Readings and Averaging
Taking multiple readings and averaging them provides a more representative blood pressure value. Fluctuations in blood pressure can occur, and averaging multiple readings can mitigate these variations.
- Initial Reading: Take the first reading after a few minutes of rest. Record this reading.
- Repeat Readings: Wait for a few minutes between readings to allow for your blood pressure to return to a baseline level. Take 2-3 more readings.
- Averaging: Add the readings together and divide by the total number of readings. This provides a more accurate average reading.
Table of Steps for a Successful Blood Pressure Measurement
| Step | Action |
|---|---|
| 1 | Rest for 5 minutes before taking the measurement. |
| 2 | Position your arm at heart level, relaxed. |
| 3 | Center the cuff over the brachial artery. |
| 4 | Inflate the cuff to 20-30 mmHg above the pulse disappearance. |
| 5 | Deflate the cuff slowly and steadily. |
| 6 | Record the systolic and diastolic pressures. |
| 7 | Repeat steps 2-6 for two more readings. |
| 8 | Average the three readings. |
Interpreting Results and Potential Issues
Understanding your blood pressure readings is crucial for managing your health. This section delves into how to interpret the numbers your home monitor displays, recognizing potential issues, and knowing when to seek professional medical advice. Accurate interpretation empowers you to take proactive steps towards maintaining a healthy blood pressure.Interpreting your blood pressure readings involves understanding the significance of systolic and diastolic pressures, recognizing patterns, and understanding what might cause fluctuations.
Taking accurate blood pressure readings at home is crucial for managing your health. Proper technique is key – using the right cuff size and ensuring a relaxed arm position are essential. While some research suggests that certain anti diarrheal drugs might be surprisingly effective in helping manage opioid addiction, anti diarrheal drugs help fight opioid addiction , remember that consistent, accurate home blood pressure readings are still the best way to track your health trends.
A regular, well-executed home test helps you catch any potential problems early on.
A consistent understanding of your readings can help you identify potential underlying health conditions or react appropriately to changes in your health.
Interpreting Systolic and Diastolic Values
Blood pressure readings are typically presented as two numbers, for example, 120/80 mmHg. The first number (systolic) reflects the pressure in your arteries when your heart beats, while the second number (diastolic) represents the pressure when your heart rests between beats. A healthy blood pressure reading is generally considered to be below 120/80 mmHg.
Understanding Blood Pressure Classification
A blood pressure classification table can aid in understanding the significance of your readings. This table provides guidelines for interpreting readings and knowing when to consult your doctor.
| Blood Pressure Category | Systolic (mmHg) | Diastolic (mmHg) | Action |
|---|---|---|---|
| Normal | Less than 120 | Less than 80 | Maintain healthy lifestyle |
| Elevated | 120-129 | Less than 80 | Lifestyle changes; consult doctor |
| Hypertension Stage 1 | 130-139 | 80-89 | Lifestyle changes; consult doctor |
| Hypertension Stage 2 | 140 or higher | 90 or higher | Consult doctor immediately |
| Hypertensive Crisis | Higher than 180 | Higher than 120 | Seek emergency medical attention |
Potential Causes of Erratic Readings
Several factors can affect the accuracy of home blood pressure readings, leading to erratic or inconsistent results. These include improper placement of the cuff, stress, caffeine intake, and recent exercise.
- Cuff Placement: Incorrect cuff placement can lead to inaccurate readings. Ensure the cuff is positioned correctly on the upper arm, centered over the brachial artery.
- Emotional State: Stress, anxiety, or excitement can temporarily elevate blood pressure. Take readings when you are relaxed and calm.
- Recent Activity: Recent exercise, smoking, or consumption of caffeine or alcohol can affect readings. Allow sufficient time to pass before taking a reading after these activities.
- Underlying Conditions: Some underlying medical conditions can cause inconsistent readings. If you experience persistent or unexplained changes in blood pressure, consult a healthcare professional.
Significant Readings and Consultation
If a reading is significantly higher or lower than your usual readings, it warrants attention. A persistently elevated reading may indicate an underlying health concern, while a significantly low reading could signal a problem. Consult your healthcare provider if you experience any of the following:
- Readings consistently above or below your usual range.
- Readings that are accompanied by symptoms like dizziness, chest pain, or shortness of breath.
- Unexplained changes in your blood pressure over time.
Maintaining Device Accuracy
Keeping your home blood pressure monitor in top condition is crucial for reliable readings. Regular maintenance ensures accurate measurements, preventing inaccurate results that could lead to incorrect diagnoses or treatment plans. A well-maintained device will provide consistent and trustworthy data over time, contributing to better health management.
Importance of Regular Maintenance
Proper maintenance extends the life of your blood pressure monitor and preserves its accuracy. Ignoring routine checks can lead to inaccurate readings, potentially impacting your health decisions. A well-maintained device ensures consistent performance, allowing for reliable tracking of your blood pressure trends.
Cleaning Procedures
Regular cleaning prevents the accumulation of dirt, oils, and other contaminants that can affect the device’s performance. Clean the cuff and the exterior of the monitor using a soft, damp cloth and a mild soap solution. Avoid harsh chemicals or abrasive materials, as these can damage the device. Thoroughly dry the device after cleaning to prevent moisture damage.
A gentle wiping motion is recommended, ensuring all surfaces are clean without causing any scratches.
Storage Guidelines
Proper storage protects the device from damage and ensures longevity. Store the device in a cool, dry place, away from direct sunlight and extreme temperatures. Avoid storing the device in humid environments, as moisture can affect the internal components. Ensure the cuff is stored appropriately, avoiding wrinkles or kinks that could affect its shape and performance. Keep the monitor in its original packaging or a protective case when not in use.
Identifying Device Malfunction
Recognizing signs of malfunction is essential for prompt repair or replacement. Pay attention to any unusual sounds or vibrations from the device. Inconsistent readings, a fluctuating display, or a sudden stop in operation are all potential indicators of a problem. If you observe any of these signs, consult the manufacturer’s instructions or contact a qualified technician for diagnosis and resolution.
Calibration Procedures
Calibration ensures the device’s accuracy by adjusting it to a known standard. Refer to the manufacturer’s instructions for specific calibration procedures. These instructions will detail the required steps and any necessary equipment. Typically, calibration involves comparing the device’s readings to a known standard or using a calibration tool provided by the manufacturer.
Calibration Frequency
The frequency of calibration depends on the manufacturer’s recommendations and the intensity of use. Some monitors may require calibration every few months, while others might need it annually. Regularly check the manufacturer’s manual for specific guidelines. If you use the device frequently, consider calibrating it more often to maintain optimal accuracy.
Maintenance Schedule
The following table provides a general guideline for maintenance tasks and their recommended frequency. Note that these are general guidelines; specific frequencies may vary based on the manufacturer’s recommendations.
| Maintenance Task | Frequency |
|---|---|
| Cleaning the cuff and exterior | Weekly |
| Checking for malfunction signs | Monthly |
| Calibration | Annually or as per manufacturer’s instructions |
| Inspecting battery life (if applicable) | Monthly |
Visual Aids and Illustrations
Understanding home blood pressure devices goes beyond just knowing the numbers. Visual aids are crucial for effectively grasping the proper techniques and interpreting results. Clear illustrations make the process intuitive, helping users confidently and correctly use their home blood pressure monitors.
Proper Cuff Placement Illustration
Accurate cuff placement is paramount for reliable readings. The cuff should be positioned snugly around the upper arm, centered over the brachial artery. A visual illustration would show the cuff positioned just above the elbow crease, with the bottom edge of the cuff aligned with the level of the heart. It should not be too loose or too tight, as either extreme can lead to inaccurate readings.
The illustration should highlight the importance of avoiding compression of underlying tissues.
Correct Procedure Infographic
A comprehensive infographic demonstrating the correct procedure would be extremely helpful. It should depict each step in a clear, sequential manner. Starting with the preparation (resting comfortably, for example), it would visually guide users through the process of inflating the cuff, listening to the sounds, and deflating it slowly. The infographic should include clear instructions for each step, ensuring that users understand the importance of each action and how it contributes to an accurate reading.
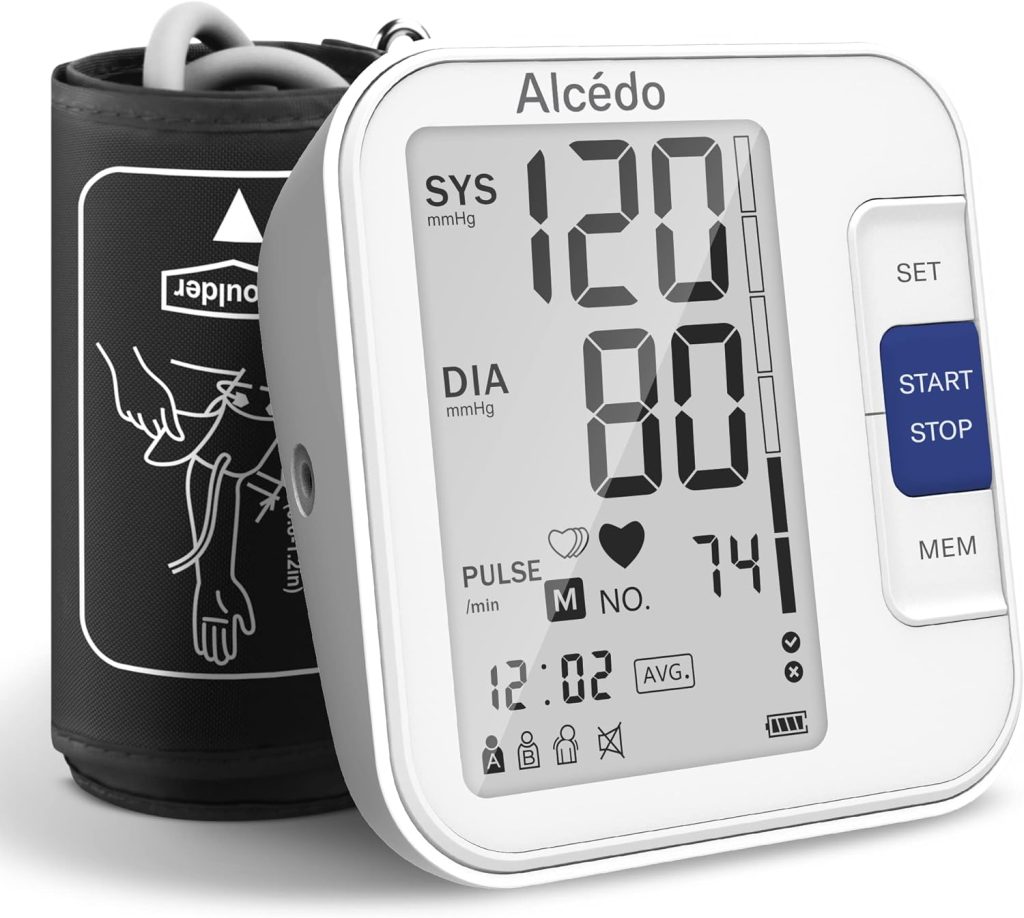
Home Blood Pressure Monitor Parts Diagram
A diagram illustrating the different parts of a home blood pressure monitor is beneficial for understanding its functionality. The diagram should clearly label the cuff, the inflation pump, the pressure gauge, the pressure-measuring mechanism, and the display. Highlighting how each component interacts and contributes to the overall process would further enhance understanding.
Blood Pressure Reading Positions Diagram
Different positions can affect blood pressure readings. A diagram should illustrate the ideal position for taking a reading, which is typically sitting with the feet flat on the floor and the back supported against a chair or similar support. Additional positions, such as lying down, should also be shown and their potential implications for results should be clearly noted.
The illustration should visually distinguish between these positions and their potential effects on the reading.
Blood Pressure Reading Interpretation Graphic
Visualizing blood pressure readings is crucial for understanding the results. A graphic should display a simplified representation of blood pressure values. The graphic should clearly demarcate normal, pre-hypertension, and hypertension ranges, using color-coding to easily identify the category each reading falls into. It should include an explanation of what each range means in terms of health risks and recommended lifestyle changes.
Home Blood Pressure Monitor with Labeled Parts Image, How a home blood pressure test devices accuracy use correctly
A comprehensive image of a home blood pressure monitor with clearly labeled parts is an excellent learning tool. The image should show the monitor from a perspective that clearly depicts all essential components. Labels should identify the cuff, the inflation pump, the display, the pressure gauge, and the on/off button. This image provides a visual reference for recognizing the different parts and their functions.
Closing Summary: How A Home Blood Pressure Test Devices Accuracy Use Correctly
In conclusion, achieving accurate blood pressure readings at home requires a multifaceted approach. From selecting the right device and understanding its mechanics to mastering the proper technique and recognizing potential pitfalls, this guide equips you with the knowledge to confidently monitor your blood pressure. Remember to always consult your doctor for any concerns regarding your readings or overall health.
By following these practical steps, you can gain a better understanding of your blood pressure and work towards optimal well-being.